Sunday, September 21, 2008

SPP vs ACR

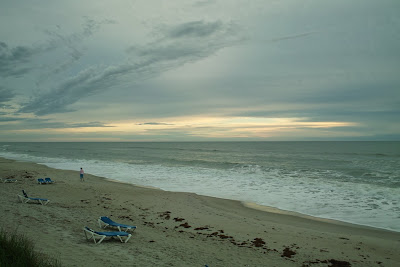
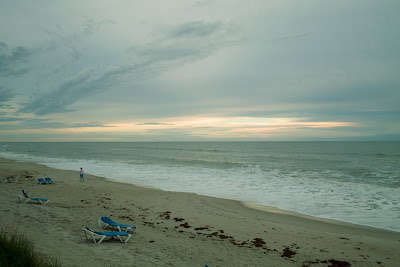
SPP
ACR
SPP
ACR

Like many people I was quite excited to learn that the new version of ACR has preliminary support for the DP1 files.  What this means to me is support for my images in Lightroom.  The SPP RAW developer does a great job...one image at a time.  It also is just a RAW developer and has no real cataloging capabilities.  After spending the last 2 years with Aperture I have really come to appreciate the convenience.

Sadly I have to report that so far I have found ACR lacking, although the images do appear to be about 90% identical.  The 2 images I used to test the programs each have very delicate tonalities and it is here that I find ACR to be lacking.  It is in the rendering of subtle tones that the magic happens I think.  Without this the perceived 3-D effect is missing. 

I have no real expectations that the subtleties will show properly here but I will do my best to describe them.

Approaching Storm beach picture.  SPP image shows substantially more low grey clouds in an almost 3-D rendition, ACR does not.  This is perhaps  "Micro contrast" but I can really see that there is an altitude difference in the clouds.  This is somewhat lacking in the ACR image. Also, the SPP image contains more colors around the brightest part of the sky than the ACR image.

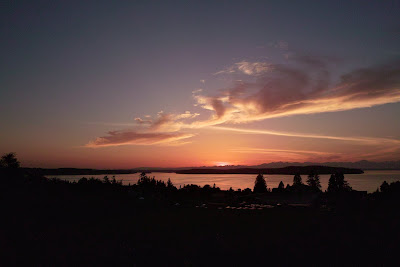
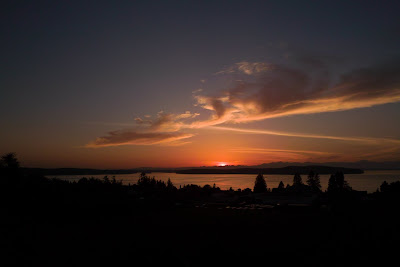
Olympic Mountain sunset picture.  It is here that I immediately see the difference.  The sun's disk is completely blown out on the ACR image where the SPP image shows delicate cloud cover.  Also, the ACR image is starting to show that horrid bright yellow ring around the sun.  This is something I NEVER see when observing sunsets but that digital cameras almost always do.  I was quite excited to find that the DP1 didn't show this ring...now here it is again.

To be fair there are some things I like better on the ACR image.  The noise in the dark areas of the sunset picture are more controlled and much easier for me to accept.  The ACR image also seems to have a bit more mid contrast but that could be an illusion from the increased saturation the image displays.

So I guess I won't be spending the money for Lightroom just yet.

Sunday, September 14, 2008

some more Reds and DP1


Here is another example of Foveon and red.  I'm not sure why I'm posting yet another example, perhaps because it's so easy to deal with and there seems to be a never ending discussion about this.  


I made 2 quick adjustments to this image, one of them Vignetting.  I would have made this adjustment to the image regardless of sensor; darkening the edges a bit keeps the image together somehow and focuses the attention on the roses.  I have darkened the edges of my (B&W) prints long before I ever knew there was an actual term for this action.  First time I heard vignetting I was thinking about a vinegar salad dressing.


The other adjustment was to "Fix" the red as pink phenomenon I notice with the DP1.  The steps for this in Aperture (and probably in other programs) are just about as easy as it gets.


Aperture has a Color Correction Tool.  When selected it opens a loupe and turns the cursor to an eyedropper.  Clicking on the offending color selects it.  The adjustment sliders are Hue, Saturation, Luminance and Range.  Hue is the fixer.  I select the red and simply click the slider to the right (towards yellow).  I have found that 10 or 11 clicks usually do it.  Saturation and Luminance are self descriptive and Range allows me to adjust the sensitivity of the color selection from "Razor sharp" to "Broad brush."


I used the AML-1 close up attachment and grabbed a couple of quick shots.  I had no time to properly work this scene but the colors are what I was looking for.

a DP1 Workflow

My current workflow is to review my images with SPP.  If I find some I like I process as 16 bit tiffs and save / manage the tiffs in Aperture.  I have wondered if perhaps it might be better to process all of the images as lower res JPGs with the thought being to go back and work the best images later.


This question is similar to the one I face when scanning film.  Should I do quick low resolution scans and re scan the selects later or should I spend more time determining which are the best.  I have compromised with the film scans in that I scan most images as medium resolution JPGs and occasionally re scan certain negatives later.


I am relatively certain that I will remain with my present system for my DP1 images until Aperture or Lightroom is able to process the RAW images and then will not use SPP again.  I have a suspicion that Lightroom will support the DP1 relatively soon and that Aperture will never support the DP1.  This is sad as I have come to be quite comfortable with Aperture and also sad because it will require the expenditure of more multiple hundreds of dollars.  I am having some serious doubts about this whole RAW thing...seems as though there is ALWAYS another program that needs to be purchased.  When do the benefits start to accrue again?


Well, if I do change to Lightroom I will once again be able to avail myself of the wit and wisdom of Scott Kelby and crew...that's a plus.


Monday, September 8, 2008

all creatures


After tropical storm Hanna blew bye I found this beautiful creature in the garage.  After posing for a few photographs she went on her way.  In search of breakfast perhaps.

I attached the AML-1 close up lens to the DP1 and used the Nikon SB30 small flash.  Exposure took a couple of tries. At 1/8 power and f11 I got pretty good exposure, but she was in a rush and so I was too.  Focus was a bit more tricky.  I couldn't remember exactly what the focus range was for the AML-1 and so tried to keep the camera about 11 inches from the small snake.   Out of about 15 shots I got these 4.  I needed to apply edge sharpening on all 4.  The others were either dramatically overexposed or most often out of focus.

Friday, September 5, 2008

DP1 and Film


Been a busy summer so far.  Little time for Blogging.  Since starting to understand the DP1 I have become quite pleased with the film like quality of the images...and that would be print film vs slide or chrome film.  

I have always appreciated print film but frankly the variances in the printing process were unacceptable.  Each lab was different and each technician in a lab produced different results.  As the problem was with the printing and not the developing of the film, now that we have scanners and software we can take control of the output part.  Print film brings a wide range of subtle tones and colors.  I believe the dynamic range to be quite a bit greater than slides...or digital for that matter.  My choice in the print films is Kodak's Portra with 160NC being my favorite.

These 2 images are from Mt Rainier National Park.  I had Portra 160NC loaded in my xPan with the 45mm lens.  Interestingly the field of view appears to be about the same as the DP1.

Also of interest to me is that with each camera I really wanted a few more degrees of coverage.  The water had cut through several yards of stone to form the pool and it was very dramatic. Many bemoan the lack of a zoom or a "Normal" lens on the DP1 but as yet I've wished only for wider.

Technical details.  

DP1: WB Shade,  ISO 100, f8, 0.4 seconds exposure.
xPan 45mm, ISO 160, f11, 0.5 seconds

I "Quick" scanned the film on an Epson V700 using Epson scanner software at 1200 dpi.  I have the ability to derive substantially more information from this negative by upping the scan quality and also by using Silverfast software (multi-exposure) and will probably do just that when I have a few moments.

I saved each image as a TIFF file in Aperture and drew middle grey white balance from a point on the rocks  above the red tree trunk.  Other than that no adjustments were made.

I'm quite impressed with the similarities in these images and frankly when I closely inspect the corners of the images I am once again in awe of the lens on the DP1.  I'll say this again, with the many multiple dollars I've spent on glass over the years (a bunch) I have never had a better lens than the one on my DP1.