Wednesday, December 31, 2008

Fill Light


As my DP1 RAW files aren't read by Aperture I process them in the manufacturer's software SPP.  This does a very good job as might be expected but is painfully slow and it's not really a program for managing large numbers of images.  SPP does offer some additional adjustment capabilities though, one of them is Fill Light.  Other programs have fill light capabilities but they're different.

The Fill Light adjustment has both positive and negative capabilities.  Positive fill light approaches a somewhat HDR effect.  Negative fill light adds a dream like quality to images, it's fun to play with.  The impact is most pronounced around the lightest part of the image.

Monday, December 29, 2008

Ohio Wheat


I was driving some back roads in southern Ohio this summer.  One of them ended in a wheat field.  I didn't expect wheat in Ohio.  Once again the clarity of this DP1 lens astounds me.


various manipulations


It's been 3 months since I updated this blog.  This is due to several factors: I'm evidently quite lazy; I've been busy this fall; and, I'm not at all certain about the nature of this (or any) blog.

A blog is perhaps just a journal or diary but if that's true then why electronically publish it?  

I originally had the idea that the DP1 being a new type of camera this blog might be of use to some considering one or starting to use one.  I believe that this has been true.  But then why continue to publish repeats of the same information if not for ego reasons.  OK, ego, I guess that's good enough.

Having used the camera for over 8 months I have started to understand it and the software enough to experiment.  I will post some examples here and on future entries.

I have recently returned from a photo trip through parts of the American South West.  I learned more about my personal style of photography (and the DP1) than I had expected.  I will post some pictures on future entries.

Regarding manipulation.  I have always been interested in platinum / palladium images.  These seem to convey an additional presence not found in other printing methods.  As reference I would point of course to the work of Alfred Stieglitz.  This process requires a large negative to be contact printed onto paper which has been treated with a platinum / palladium substance.  The work is expensive if nothing else.  It also requires the ability and the place to work with chemicals, light boxes and of course large negatives.

There are many people presently using this method and producing quite stunning work.  I point to 2 whose work I own and enjoy, Beth Dow and Dalton Rooney.  Beth has arranged to have some of her work professionally prepared, copied (?) and printed digitally, the result is that I can afford some...thank you Beth.

Dalton Rooney is an exceptional photographer from Brooklyn who recently started to experiment with the process and sold a few of his first works for next to nothing, probably not enough to cover expenses.  I have one and just love it.

With an increasing understanding of my DP1 and a love of B&W and platinum photography I have decided to see if I can put something together digitally.  This is my first attempt.

I like the color image, the yellow is very delicate. I also like the almost monochrome background but wish it were a bit less in focus.  I wondered if background manipulation would add to the 3-D impact of the flower.  I am terrible with Photoshop.  Fortunately the few tools I needed to use were quite intuitive.  I outlined the flower with a magnetic lasso inverted and applied a blur filter.  Changed image to B&W and added toning in an attempt to match the color I see in platinum / palladium prints.  I need to do more with yellow.  The color is very hard to get correct.  I am also thinking about bringing some of the leaves into focus.

Sunday, September 21, 2008

SPP vs ACR

SPP
ACR
SPP
ACR

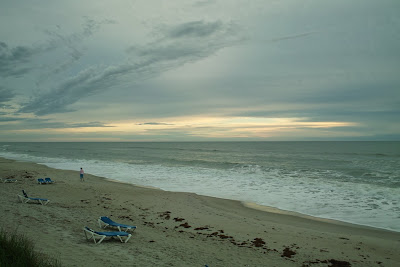
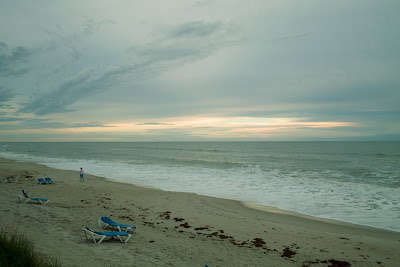
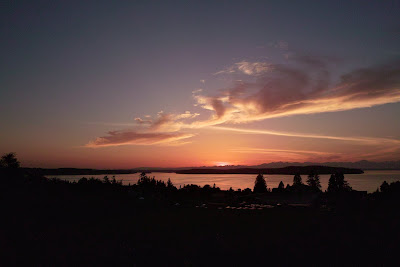
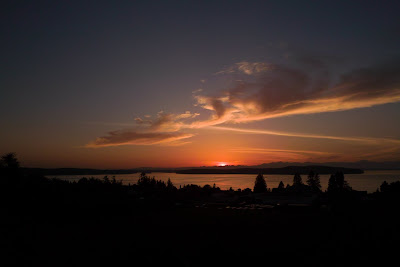
Like many people I was quite excited to learn that the new version of ACR has preliminary support for the DP1 files.  What this means to me is support for my images in Lightroom.  The SPP RAW developer does a great job...one image at a time.  It also is just a RAW developer and has no real cataloging capabilities.  After spending the last 2 years with Aperture I have really come to appreciate the convenience.

Sadly I have to report that so far I have found ACR lacking, although the images do appear to be about 90% identical.  The 2 images I used to test the programs each have very delicate tonalities and it is here that I find ACR to be lacking.  It is in the rendering of subtle tones that the magic happens I think.  Without this the perceived 3-D effect is missing. 

I have no real expectations that the subtleties will show properly here but I will do my best to describe them.

Approaching Storm beach picture.  SPP image shows substantially more low grey clouds in an almost 3-D rendition, ACR does not.  This is perhaps  "Micro contrast" but I can really see that there is an altitude difference in the clouds.  This is somewhat lacking in the ACR image. Also, the SPP image contains more colors around the brightest part of the sky than the ACR image.

Olympic Mountain sunset picture.  It is here that I immediately see the difference.  The sun's disk is completely blown out on the ACR image where the SPP image shows delicate cloud cover.  Also, the ACR image is starting to show that horrid bright yellow ring around the sun.  This is something I NEVER see when observing sunsets but that digital cameras almost always do.  I was quite excited to find that the DP1 didn't show this ring...now here it is again.

To be fair there are some things I like better on the ACR image.  The noise in the dark areas of the sunset picture are more controlled and much easier for me to accept.  The ACR image also seems to have a bit more mid contrast but that could be an illusion from the increased saturation the image displays.

So I guess I won't be spending the money for Lightroom just yet.

Sunday, September 14, 2008

some more Reds and DP1


Here is another example of Foveon and red.  I'm not sure why I'm posting yet another example, perhaps because it's so easy to deal with and there seems to be a never ending discussion about this.  


I made 2 quick adjustments to this image, one of them Vignetting.  I would have made this adjustment to the image regardless of sensor; darkening the edges a bit keeps the image together somehow and focuses the attention on the roses.  I have darkened the edges of my (B&W) prints long before I ever knew there was an actual term for this action.  First time I heard vignetting I was thinking about a vinegar salad dressing.


The other adjustment was to "Fix" the red as pink phenomenon I notice with the DP1.  The steps for this in Aperture (and probably in other programs) are just about as easy as it gets.


Aperture has a Color Correction Tool.  When selected it opens a loupe and turns the cursor to an eyedropper.  Clicking on the offending color selects it.  The adjustment sliders are Hue, Saturation, Luminance and Range.  Hue is the fixer.  I select the red and simply click the slider to the right (towards yellow).  I have found that 10 or 11 clicks usually do it.  Saturation and Luminance are self descriptive and Range allows me to adjust the sensitivity of the color selection from "Razor sharp" to "Broad brush."


I used the AML-1 close up attachment and grabbed a couple of quick shots.  I had no time to properly work this scene but the colors are what I was looking for.

a DP1 Workflow

My current workflow is to review my images with SPP.  If I find some I like I process as 16 bit tiffs and save / manage the tiffs in Aperture.  I have wondered if perhaps it might be better to process all of the images as lower res JPGs with the thought being to go back and work the best images later.


This question is similar to the one I face when scanning film.  Should I do quick low resolution scans and re scan the selects later or should I spend more time determining which are the best.  I have compromised with the film scans in that I scan most images as medium resolution JPGs and occasionally re scan certain negatives later.


I am relatively certain that I will remain with my present system for my DP1 images until Aperture or Lightroom is able to process the RAW images and then will not use SPP again.  I have a suspicion that Lightroom will support the DP1 relatively soon and that Aperture will never support the DP1.  This is sad as I have come to be quite comfortable with Aperture and also sad because it will require the expenditure of more multiple hundreds of dollars.  I am having some serious doubts about this whole RAW thing...seems as though there is ALWAYS another program that needs to be purchased.  When do the benefits start to accrue again?


Well, if I do change to Lightroom I will once again be able to avail myself of the wit and wisdom of Scott Kelby and crew...that's a plus.


Monday, September 8, 2008

all creatures


After tropical storm Hanna blew bye I found this beautiful creature in the garage.  After posing for a few photographs she went on her way.  In search of breakfast perhaps.

I attached the AML-1 close up lens to the DP1 and used the Nikon SB30 small flash.  Exposure took a couple of tries. At 1/8 power and f11 I got pretty good exposure, but she was in a rush and so I was too.  Focus was a bit more tricky.  I couldn't remember exactly what the focus range was for the AML-1 and so tried to keep the camera about 11 inches from the small snake.   Out of about 15 shots I got these 4.  I needed to apply edge sharpening on all 4.  The others were either dramatically overexposed or most often out of focus.

Friday, September 5, 2008

DP1 and Film


Been a busy summer so far.  Little time for Blogging.  Since starting to understand the DP1 I have become quite pleased with the film like quality of the images...and that would be print film vs slide or chrome film.  

I have always appreciated print film but frankly the variances in the printing process were unacceptable.  Each lab was different and each technician in a lab produced different results.  As the problem was with the printing and not the developing of the film, now that we have scanners and software we can take control of the output part.  Print film brings a wide range of subtle tones and colors.  I believe the dynamic range to be quite a bit greater than slides...or digital for that matter.  My choice in the print films is Kodak's Portra with 160NC being my favorite.

These 2 images are from Mt Rainier National Park.  I had Portra 160NC loaded in my xPan with the 45mm lens.  Interestingly the field of view appears to be about the same as the DP1.

Also of interest to me is that with each camera I really wanted a few more degrees of coverage.  The water had cut through several yards of stone to form the pool and it was very dramatic. Many bemoan the lack of a zoom or a "Normal" lens on the DP1 but as yet I've wished only for wider.

Technical details.  

DP1: WB Shade,  ISO 100, f8, 0.4 seconds exposure.
xPan 45mm, ISO 160, f11, 0.5 seconds

I "Quick" scanned the film on an Epson V700 using Epson scanner software at 1200 dpi.  I have the ability to derive substantially more information from this negative by upping the scan quality and also by using Silverfast software (multi-exposure) and will probably do just that when I have a few moments.

I saved each image as a TIFF file in Aperture and drew middle grey white balance from a point on the rocks  above the red tree trunk.  Other than that no adjustments were made.

I'm quite impressed with the similarities in these images and frankly when I closely inspect the corners of the images I am once again in awe of the lens on the DP1.  I'll say this again, with the many multiple dollars I've spent on glass over the years (a bunch) I have never had a better lens than the one on my DP1.

Monday, July 21, 2008

Seattle at night


The opportunity to photograph belly dancers brought me to Seattle the other day.  This was quite an interesting exercise, once I edit the images I'm thinking I will have a few keepers.

The opportunity to photograph the city on a clear night with a large moon rising was irresistible.I completely mis read the Yahoo map of seattle, or else I don't understand the Navy Altitude/Azimuth charts, or some of each.  I had not positioned myself properly to take advantage of the moonrise as I had hoped.  Oh well.  What I was able to do was photograph the city again from an area I've used before, the result is above.  I am quite impressed with this camera's abilities yet again.  I like this image very much.  It's different, better somehow from the other images from the same place, film or digital.

Technically I had the camera on a tripod of course, but I had the meter set to center weighted.  I reviewed the images with a loupe after shooting and could quickly see that they were overexposed, didn't think to try spot metering.  This shot was at a -3 EV, I think it's just about right.

A few interesting notes.  The dots in the sky are celestial objects, most are stars, the bright one in the middle of the sky is a planet.  Not sure which planet, Venus perhaps.  The streaks are airplanes taking off.  I am looking south and there are 2 active airports there, Boeing Field on the right side of the image and SeaTac towards the middle.  Aircraft flying north will usually turn just before reaching the city and I see there are 2 streaks from turning aircraft, the alternating green and red wing tip lights are visible.  Above and a bit to the right of the red roof is a glimpse of Mount Rainier.

Tuesday, July 15, 2008

DP1, lavender and red


Spent a few hours in Sequim WA where the lavender is in bloom.  Very lovely fields, various shades of purple flowers, well manicured green grass, plantings of vibrant red poppies and the occasional yellow sunflower.  I'm sure that running a lavender farm is a full time job, much like any other job, but at this time of year I wonder if one gets paid to work there or has to pay for the opportunity.

As I was "Chimping" the pictures I was taking I couldn't help wondering just how to deal with the red colors, which as expected look too pink to me.  The fix was much simpler than expected.  I use Apple's Aperture to manage my image files and the adjustment tools it offers are quite comprehensive.  One of the boxes is labeled "Color" and offers an eyedropper tool to adjust Hue, Saturation, Luminance and Range of the color selected.  I selected the pink and moved the Hue slider about 11 clicks toward the yellow side.  The results are very good and toggling quickly between the original and adjustment shows me no variation in any other color at all.

So easy even I can do it.  I am quite certain that CS3 offers similar capabilities.  I also expect that Elements, iPhoto, and a host of other tools also have this capability.  It's also possible that SPP has some abilities here as well but I don't know for sure.

Monday, July 7, 2008

DP1 lens choice


Earl Thomas

John Lee Hooker Jr.

Randy Oxford trombone

The Legendary Roy Gaines

Tony Ruiz, bass man for Dennis Jones Band

Admittedly I differ from many others in my choice of lenses.  I have found that a wide angle is almost always the correct choice and a telephoto a poor choice.  I'm not sure why this is.  The concept of "Getting more in" is probably part of it but a small part.  I am quite excited by changes in perspective.  For this reason I find the (28mm) lens to be a good choice.  

In reality it is a bit longer than I most often use(d) with my Nikon but quite acceptable.  The above photo's are all shot with a Nikon DSLR using the 12~24mm lens at 12mm.  With the chip size factor this equates to about 18mm, unusually wide for many,  just right for me.

When my Granddaughter Emma was born,  "Can you believe I'm six?" I purchased my first digital camera.  I also attached a Contax TVS point and shoot film camera to my belt, right next to my cell phone.  The TVS has a 35 ~ 60mm zoom.  35 to 60 should be called "Zoom?" it ain't much.  Reviewing the images shot at each end of the range though I found that I almost never was unhappy when choosing 35mm and quite often was when I chose 60mm.

What this tells me is that if Sigma offered an identical camera with a longer lens I would NOT be part of the rush.

Wednesday, June 25, 2008

That's all?

There is a current large discussion thread about Foveon and Red.  I have been aware of other questions about the chip's capabilities with red and so I participated.  I had hoped to learn something about the DP1's capabilities.

As near as I can tell from the thread, this chip sometimes produces a red with too much pink overtone.  Umm...huh?  Is that what this is all about?  A piece of cake adjustment in Aperture or Photoshop or one of many other programs generates this much discussion?

An inability to focus properly or render fine detail now that's a REAL problem.  A completely blown out unrecoverable red channel...yup a REAL problem.  A little too much pink?   C'mon.  Really?

Tuesday, June 24, 2008

DP1 and Red

                                   D80 100mm
                                   DP1

                                   D80 12 ~ 24mm
                                   DP1

Quite a buzz in dpreview today about the Foveon chip and red.  It seems that there is a general wisdom that this chip has a problem with red.  On it's face this makes absolutely no sense to me.  33% of the sensors are for red on a Foveon chip and 25% of the B&W sensors of bayer type chips are masked to read red.  On it's face 33% is larger than 25% so the confusion starts.

There would be at least 3 avenues here, perhaps more.  The 3 I see are:
How well it reproduces color;
how well it focuses on red detail; and for me most importantly,
how it does in red light.

As I photograph a lot of musicians I often enter clubs with the stage lit by red spot lights.  I usually mention to the club management that the red light is quite unflattering to the musicians.  If this doesn't work I just grumble like other seasoned photographers.  I usually carry a small film camera just in case.
Let's be real blunt here.  With a Bayer chip you WILL NOT get a good photograph in red light.  Don't care if you desaturate to B&W, skin still looks horrid.  If a flash is used the power it takes to overcome the red light burns right through all of the other channels as well.

I have been using the DP1 in red light situations and although were not talking works of art here I do believe it does a better job than my Nikon.

I don't do much macro work or close-ups of flowers so I have little experience with true colors here or focusing abilities.  I did take the above shots today of my tail light. 

With the Nikon I used 2 lenses, a 100mm macro lens and a 12-24mm set to appx the same setting as the DP1.  I tried different f stops and a couple of different ISO's to ensure fast shutter speeds.  WB set to Daylight, DP1 images developed as X3 and saved as 16 bit tiffs, Nikon developed in Aperture 2.

Interesting to me is how orange the 100mm shot is, and how poorly it focused, perhaps due to short DOF.
The other shots are quite similar.  The DP1 color seems a bit pink but this is very easily adjusted in Aperture as well as other programs.  I also see the DP1 image much more is in focus (look at right side of the image) but perhaps this is due in part to the Sigma lens quality.

In any event.  If there's an inherent red problem with the Foveon chip I'm not seeing it.  As someone mentioned though this may be due to ultra violet influence of some sort in flower photography.

Monday, June 23, 2008

DP1 Accessories 3


I have the HA-11 Hood for my DP1.  It works well but causes a problem.  The square hood doesn't have a cover or accept any conventional type cap as near as I can determine.  The problem then becomes deciding if it's better to remove the hood and carry it separately or to leave the lens uncovered.  If the lens is uncovered it seems to actively attract dust which is hard to remove unless of course I remove the hood.

Fortunately the round section of the HA-11 is threaded and another camera's hood will screw into it, in my case the metal Contax GG-2 hood.  Further, the GG-2 size is 55mm meaning the cap from my Tokina 100mm macro fits perfectly, more easily than the Contax cap.  Now if only the GG-2 was threaded so I could use the damn fine polarizer I bought for the 100mm Tokina.

One side note, with this installed I am able to turn the DP1 on without worrying about first removing the Sigma lens cap.  A small thing to be sure but to me a comfortable one.  

With the multi color hood, the Tokina cap and the invisi shield plastic installed and peeling it sure is a raggedy looking thing.  Fits me somehow.

Sunday, June 22, 2008

DP1 Accessories 2


been some mentions of wrist straps on the Sigma group at dpreview.  There would be 2 great functions for a camera strap.  One is to keep the camera positioned to always be ready to shoot.  However your arm was moved the camera would always be facing the proper direction and the shutter release button would be near a finger.  I don't have any idea what this would look like but I often find myself wrapping the camera neck strap around my hand trying to figure it out.

The second (or perhaps first) great function would be to prevent the camera from hitting the floor.  I have found that if something hits the back of my hand, or I bump it while walking perhaps, my fingers just spring open...seems to have become an auto response.  I have a wrist strap for my DSLR which was made by OPTECH/USA and it has saved my Nikon more than once in crowds.  Looks kinda geeky but Oh Well.

When I bought a DP1 I went to the local camera store browsing straps and found another strap also made by OPTECH/USA.   Like the SLR strap it has kept the DP1 from meeting the pavement more than once.

The attachment string is much too thick for the DP1 lugs but fortunately the DP1 neck strap comes apart in sections.  I attached the clip to the DP1 neck strap and the wrist strap to the clip.  Works pretty well.

And...at about $10.00 if I do find the perfect strap at least I won't feel like I've thrown my money away.

DP1 Accessories


I have found that regardless of their advertising device screens scratch.  Also, when i drop a device (as I do semi-often) the case is usually damaged.  So.  One of the first things I do after buying a new electronic device is cover it with protective plastic.  A custom designed bullet proof body condom would be great but they're almost never available and if they are the price is prohibitive.  

I found a product called "invisi-shield" a few years back.  The clear plastic is quite indestructible. The company selling this product changed over time now calling themselves Zagg I believe.  I purchased a kit for a cell phone 2 or 3 years ago and it worked great.  The plastic protects the screen and the extra pieces seem to work well on the edges of the device.  Not perfect protection from drops but quite good.  I even had an extra piece which i installed on my son's point n shoot before his first tour to Afghanistan.  Son and camera home unharmed each time thank God.

So I purchased the largest piece they had available, fit for a laptop computer and I cut pieces from it with a very sharp pair of scissors.  Knifes (or razors) don't seem to trim this substance.

I had to return my DP1 because of dust. I peeled the plastic off and re used it on the replacement camera.  The sticky stuff still works pretty well but it doesn't look as good the second time around.  In a way though this is actually better.  When folks first see my camera they often think it's held together with scotch tape.  I'm imagining it's less attractive and less likely to go home in someone else's pocket that way.

One thing I learned from a previous camera is that a mono-pod scratches.  I put a piece of plastic over the tripod screw hole (difficult to cut properly) and there are no scratches.  I also cover ends and corners against the inevitable drops.  As I had a dust problem I have also begun to cover seams.  Who knows if it will help or not.

Saturday, June 21, 2008

Subtle Differences


Differences which may seem obvious are often hard to quantify meaningfully.  Jerry Seinfeld had a comedy routine where he would mimic sprinters approaching the finish line.  The winner had his head forward at a 90 degree angle to his body.  89 degrees was second and the person with his head upright was dead last.  Seeing who won was easy, determining the qualitative differences between athletes is quite a bit harder

I look at some of my DP1 images and the differences between these and similar bayer type DSLR images is immediately obvious.  Quantifying what the differences are however requires more words.

The above image, taken near my home looks west over the southern part of the Puget Sound towards the Olympic Mountain Range.  I have taken many many many images from this spot so the images demand comparison.  Most of the images were taken with a Nikon D-80.  The 10mp chip in this camera is first rate and I have a collection of glass,  all quite good.  I have a handful of film images, chrome and negative from this spot as well.

What I have come to expect from digital is a "Snapping-up" of the colors in the sky, an unusual ring (brilliant yellow) around the sun and a complete loss of detail on the sun's disc.  I have tried many different exposure and filtering methods as well as Photomatix Pro HDR combinations.  None rock me.

The DP1 shot surprised me immediately with no yellow ring and cloud detail over the sun.  This translates quite well in a print.  Further study also made me realize that the colors are more as I remember them and the color transitions softer.  There are DOZENS of differences in color shade between the sun and the clouds and many more in the clouds themselves. 

The largest paper I have presently is 13x19.  When I print several images of this scene taken with both types of digital camera I notice that people will immediately remark "Oh Wow!" at the striking saturated colors delivered by my Nikon but always come back to this DP1 image with a "This is my favorite!"  Mine too.

On the both good and bad side.  I have begun to look again at my recent film images and am liking them a whole lot more than I thought I would,  (subtle colors, smooth transitions).  I was planning to sell the film gear...Oh well.


Sunday, June 15, 2008

More DP1 low light


These images are from last week.  The weather here in Seattle has been quite nice, sun and everything for 3 days in a row now.

As the saying goes you can tell the seasons here by which team is playing in the rain.  Mariners it must be summer.

These images, 2 at asa 800 and 1 at 400 were hand held.  I had a monopod with me and should have used it for the night shot but I had found a very small overhang which blocked much but not all of the rain and I was uncertain how much moisture the camera would withstand.  At any rate asa800, f4 at 1/10th second.

Saturday, June 7, 2008

DP1 + Flash


I purchased a Nikon SB-30 flash unit for the DP1.  This is a small flash originally produced by Nikon for their film cameras.  It's still available new from Nikon for under $90.00.  I got mine through Amazon.com.  Rated at guide number 52 I believe that this flash is more powerful than the Sigma small flash, the EF-140.  It is designed to cover an area for a  28mm lens, which works out just fine.  I think the SB-30 is about the same size as the EF-140 and it comes with a nylon case with a belt loop attachment.

The disadvantage to this unit is that it's not a ttl flash for the DP1.  This is of almost no consequence for me.  When I was able to purchase my first external flash, 40 years ago, there was no such thing as ttl.  All flash photography involved math...rudimentary math.  It's not really hard.  In addition this flash unit has several settings for various f-stops and film speeds so a quasi-ttl could be set up if I wished.  What I usually do is take a quick test shot, review it on the LCD screen and make adjustments if needed.  Then I'm pretty much good to go.

I set the camera to M.  As it's the f stop that determines image brightness I can set the shutter for whatever creative urges I have.  I generally set the flash to 1/8 if within 7 feet of my subject and 1/1 if further away.  

Interestingly this flash recycles so quickly that at 1/8 power with the DP1 on continuous drive mode the flash fires for all 3 shots.  (at 1/1 I seem to get flash for exposures 1 and 3).  I use this often if at the various blues joints I frequent.  As this camera looks like any other point and shoot the 3 quick flashes are not any more annoying than the "red-eye" flash setting others are using.

Another feature is the "Wireless" flash setting.  When set on "M" the flash will fire in sync with the pop up flash on the DP1.  This works well for off camera flash for up to about 25'.  The "A" setting is for sync at a greater distance but the DP1 doesn't seem to trigger it...the Nikon flashes do though.

This flash also has adjustment capabilities (+1/2, -1/2) as well as a diffusion screen for close-up.